Breakdown of 6 ways on How to Hold Crochet Yarn and Hook
If you have just bought your first ball of yarn and first crochet hook, then this is the right blog post for you on your next few steps. Before you can start crocheting, it is very important to figure out how to hold your yarn and crochet hook! If you do not get this part right, it could mess up your tension in your project, make it turn out ugly and cause you to have painful wrists! Before you know it, you may give up crocheting before you gave it a chance!
First we start with how to hold your yarn, then we move onto how to hold your hook and finally the best posture to adopt to reduce discomfort and pain while crocheting.
*This blog post may contain affiliate links. When you make a purchase through my link, I may receive a small commission at no additional cost to you.*
Table of Contents Show
How do you hold your work yarn?
The working yarn should be on your non dominant hand and ideally draped over the index finger. Meaning if you are a right-hander, drape your working yarn over the index finger, such that the trailing end is on top of the finger and the yarn ball end is behind the finger.
The next step is to figure out how to change the tension of this yarn on your index finger, which I will go through below.
How do you know what yarn to use when crocheting?
Before we get started on holding the different parts you need for crocheting and adjusting tension, if you are wondering what time of yarn to use for crocheting, check out this comprehensive blog post on '12-point Checklist to Select the Best Yarn for Amigurumi'. Generally if you are starting out, go with a DK weight or worsted weight yarn and for cost reasons pick acrylic yarn material.
How do you hold the yarn and crochet to get the tension correct?
Let us start with the best stance for holding the yarn for general tension and my favourite go to method, then we will talk about adjustments for tight and loose crocheters with other suggestions.
Best general tension
Follow the steps listed below for holding the yarn in your non dominant hand, with the palm facing downwards away from you:
Place trailing end of yarn in between little and ring finger.
Wrap yarn around little finger.
Place yarn below the ring and middle fingers and then pull out yarn in between middle and index fingers.
Wrap around the index finger and drape it over.
Grab trailing yarn between middle finger and thumb.
After slip knot is formed, rest yarn on index finger.
Let us call this method: 'little finger + index finger wrap'.
For tight crocheters
If you are a tight crocheter, consider using these holding methods to change the tension in your yarn while crocheting. If you have no idea whether you are a tight crocheter, read the next question for some suggestions.
A tight crocheter would mean that you would do better with looser tension in your yarn hold. You could use the method I just described above which involves wrapping little finger + index finger.
Alternatively, to make the tension in the yarn hold even looser, just forgo wrapping around the little finger and insert the yarn in between the middle and index finger, pull it out and drape over the index finger. This has got to be the loosest tension you can get in your yarn hold.
Let us call this method: 'index finger wrap once'.
For loose crocheters
As for loose crocheters, you would be better off crocheting with a tighter tension in your yarn hold and I have two suggestion for those below.
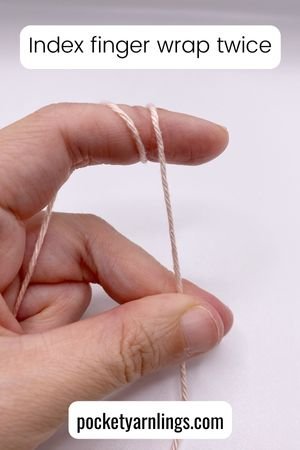
It similarly starts off the same as the 'index finger wrap once' method above, where you pull out the trailing yarn end in between the middle and index finger and drape it over the index finger. Then move onto wrapping the yarn around the index finger again such that you have 2 loops on your index finger. From here, you can feel the increased tension in the yarn hold.
Let us call this method: 'index finger wrap twice'.
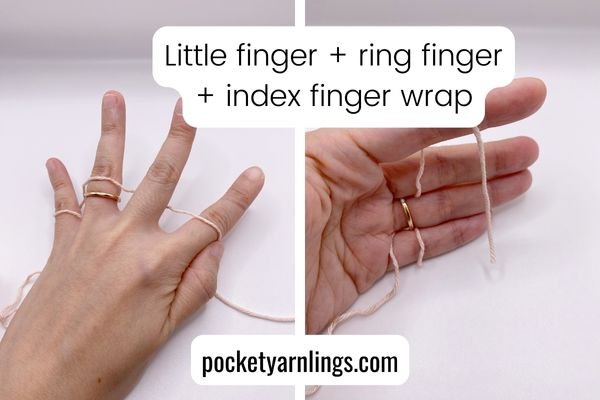
The second way to increase tension in your yarn hold for loose crocheters is to wrap the little finger, ring finger and index finger - more wraps means more tension:
Place trailing end of yarn in between little and ring finger.
Wrap yarn around little finger.
Place yarn above the ring finger and below the middle finger
Then pull out yarn in between middle and index fingers.
Wrap around the index finger and drape it over.
This involves more wrapping than the very first method mentioned above ('little finger + index finger wrap'), resulting in increased tension.
Let us call this method: 'little finger + ring finger + index finger wrap'.
My own personal trusty go to method would be the one I mentioned right above, with the wrap around the little finger to increase the tension but the drape over the index finger loose enough for comfortable crocheting.
Should you pull tight when crocheting?
No you should not pull too tightly. Crocheting is a balance of not pulling too tight or letting it be too loose. Most crocheters starting out have the issue of tight crocheting over loose crocheting, which sometimes may be the case when making amigurumi because we want to avoid gaps!
Here are some suggestions on how to tell if you are tight crocheter:
Difficulty inserting the hook into chains and stitches.
Pain in the wrists when you try the above.
Difficulty in pulling out hook from the stitches.
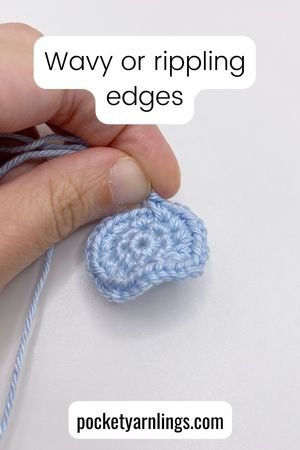
Rippling of your individual stitches.
Your crochet piece does not lay flat and may end up curling.
How do you keep even tension when crocheting?
To try your best to keep even tension throughout when crocheting, there are some considerations that may affect your tension:
Type of yarn you choose
Type of crochet hook and right size to fit the yarn you chose above
The way you hold the yarn as mentioned in detail above
The way the yarn comes out off the skein/ ball/ cake can affect the pull on your yarn hold and result in uneven tension, so some crocheters choose yarn bowls to keep the pull as consistent as possible
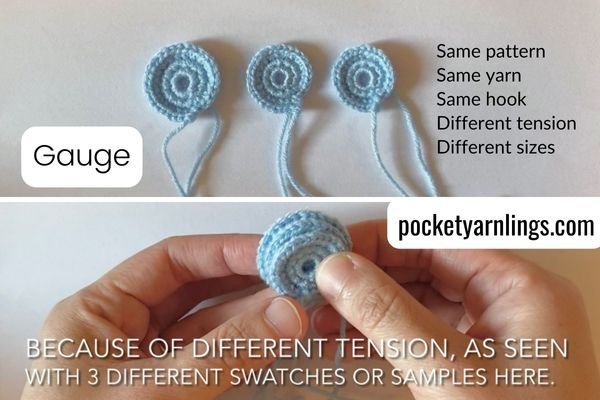
You might want to do something called a gauge. A gauge is a way to measure the space between each of your stitches, vertically between rows and horizontally between stitches.
Oftentimes, gauge is especially important for certain crochet projects like for example garments, it is important to create a sample or a swatch of the tension that you use and compare it with the pattern designer's one. Some would say that gauge is not critical for amigurumi. In a way, yes and no.
If you do not exactly follow the same tension as the designer's, you could still end up with a beautiful amigurumi piece, just either a larger size or a smaller one, possibly different from the size crocheted by the designer. However that would not affect the eventual outcome as much as say clothes or hats.
How to hold crochet hook?
Now for the above we only talked about how to hold your yarn, let us move onto how to hold your crochet hook and some different options along the way.
Which crochet hook to use with which yarn?
An important thing to think about even before considering the hook is picking the right crochet hook. If you are wondering what type of crochet hook to use, check out this comprehensive blog post on 'Best Crochet Hook for Amigurumi and 12 ways for Choice Selection'. I would definitely suggest to get an ergonomic hook and you can read all the details in that post.
Do you hold the crochet hook in your dominant hand?
Yes you hold the crochet hook in your dominant hand because that hand will be the one doing the crocheting. The working yarn like I mentioned should be on your non dominant hand and draped over the index finger.
The next step is to figure out the different ways to hold the hook in your dominant hand, which I will go through below.
What are the two ways in holding the hook?
The two ways to hold the hook, which include the pencil and knife grips. The examples given below here are for right-handers.
Knife grip
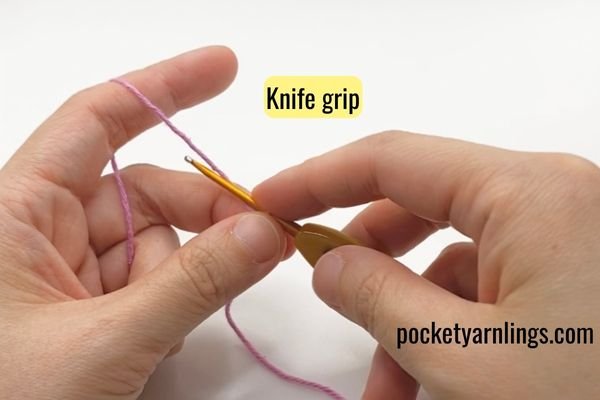
This method involves the dominant hand holding the crochet hook like a knife grip. It involves the hook grip part between the middle finger and thumb, with index finger resting on hook.
Pencil grip
Similarly position the yarn on the non-dominant hand, then hold hook using pencil grip on the dominant hand. This time, the index, middle fingers and thumb are all on the hook grip.
Is it better to hold your crochet hook like a pencil or knife?
There is technically no better way to hold a crochet hook, because different crocheters have different preferences. If you are able to master both then you could switch between each grip, which is what some crocheters do.
Consider interchanging between both grips to rest the strain on the wrists, because each hold uses different sets of muscles with different wrist motions, so switching between each grip might help with easing write pain.
Does it matter how you hold a crochet hook?
So no it does not matter how you hold a crochet hook, the most important thing is to choose the way that is most comfortable for you, so you can continue your hobby for as long periods as you can, without wrist pain!
What is the most comfortable way to hold a crochet hook?
For me personally, the knife grip is the most comfortable way. It really might be a preference depending on what style you started off with when you first learnt crocheting. I would have to say the most important factor in comfort when using a crochet hook is to pick an ergonomic crochet hook, where there is padding where you place the index finger and thumb.
Ergonomic crochet hooks are basically hooks that make the crocheting process more comfortable and less painful from the repetitive stress injuries on the hands and wrists. This could be from tweaks to the size, shape or materials to the hook. The most commonly used ones are from Clover, Etimo Tulip and Furls.
My personal favourite is actuallly Clover Soft Touch, where the shaft or handle is made of plastic and there is a soft cushion padding (see the small grey part). See more about crochet hooks here at 'Best Crochet Hook for Amigurumi and 12 ways for Choice Selection'.
How do you crochet comfortably?
This small section is on some considerations for crocheting comfortably and some simple safeguards for preventing wrist pain. I also briefly talked about some common conditions in the wrist but remember to go see your doctor to find out what your diagnosis is if you have any worsening wrist discomfort.
What is the best posture for crocheting?
Let start off with the best general posture for crocheting, which is to maintain the most neutral position you have at rest when you are sitting down. That would mean sitting down on your sofa or chair, with your feet on the ground, arms and elbows by the side, with isolated wrist movements.
If elbows are lifted from the side or lifted up in the air (i tried crocheting while lying down before), it puts unnecessary strain on the elbows and shoulders. So by isolating the other joints like the elbows and shoulders and just focusing on isolated wrist movements, you can minimize body aches while crocheting.
Why is it important to hold the yarn and hook correctly?
With all the considerations I mentioned above, you must be thinking why is it important to hold the yarn and hook correctly. Simply speaking, with even (and arguably correct) tension throughout your crocheting process, you can reduce pain and also get the final project size, appearance and quality that you want.
How do I stop my wrist from hurting when I crochet?
I will go through some simple suggestions on how to stop wrist pain when crocheting, which generally does not involve physiotherapy advice, since I am not a physiotherapist. Honestly, even as a doctor, I usually prescribe NSAIDs and advise rest, but from a crocheter's point of view, I can see how that can be a real bummer.
Some common local causes of repetitive stress injuries can include (but is not limited to) carpal tunnel syndrome, de quervain's tenosynovitis, ulnar tunnel syndrome (or Guyon's canal syndrome), tendinitis and trigger fingers. Other systemic causes or possible referred pain could be pinched nerves in the neck or arthritis, which could be osteoarthritis or rheumatoid arthritis. So if the wrist pain is persistent and not resolving with simple analgesia, I highly recommend you see a doctor to find out what is going on.
Now onto the simple suggestions to reduce pain:
Switch between different crochet hook holds like the knife hold or the pencil hold, because both grips involves different wrist and arm muscles.
Invest in ergonomic crochet hooks, they are well worth it.
Choose a smoother type of yarn that frays less.
Pick a yarn size and crochet hook that is not too large (because large movements can be tiring after a while) and that is not too small (because micro crochet can really put a strain on your wrists).
Reduce tension when crocheting, which was covered earlier in adjusting your yarn hold according to what type of crocheter you are.
Try a wrist guard, I actually used it when I had carpal tunnel after delivering and restarted crocheting and it helped a little bit.
Do you always crochet right to left?
If you are a right-hander, you would be crocheting from right to left along a chain or along a row. While on the other hand (no pun intended), if you are a left-hander, you would instead be crocheting from left to right.
So once you complete a row on the extreme left of your crochet project, to get the starting stitch again on the right, you would have to turn the whole piece. After you have done that, you can start on the right again and crochet from right to left again.
This process of turning your piece also has accompanying turning chains, for example, a single crochet with a chain of 1 to go along with it when you turn. To clarify all the questions about turning your crochet project and turning chains, check out this post on '18 detailed ways to figure out Turning Chains in Crochet'.
What is the most important consideration when holding the yarn and crochet hook?
Hopefully by reading all of the above, your final conclusion is the most important consideration when holding the yarn and crochet hook is to get maximum comfort so that you can keep on doing what you love and to reduce pain and injuries as much as possible.
Conclusion of holding yarn and crochet hook during crocheting
In this post, I reviewed how to hold your work yarn, for tight and loose crocheters, then how to hold your crochet hook using the pencil or knife grip, and finally some points on comfortable crocheting posture and some simple tips to reduce wrist pain. I hope this was useful for you and if you feel like it was, remember to share this and pin this to Pinterest so that others may read and learn from it too!
If you need help with starting your first crochet stitches with your yarn and hook, remember to join me for this free email course, teaching you all the basics of crocheting so that you can quickly get started on your first crochet project!


